Our question to Ask Gardenerd this week came from Vincent Basehart about doing a soil test, “Do you recommend soil testing, and if so, can you recommend a kit that is easy to use?”
I’m so glad you asked about soil tests, Vincent, because getting a soil test is so important. It’s like driving with your eyes open. There are a few levels of soil tests, so we’ll start with the one you can do at home.
Store Bought Soil Test Kits
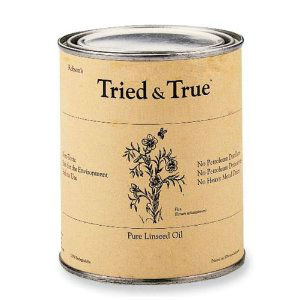
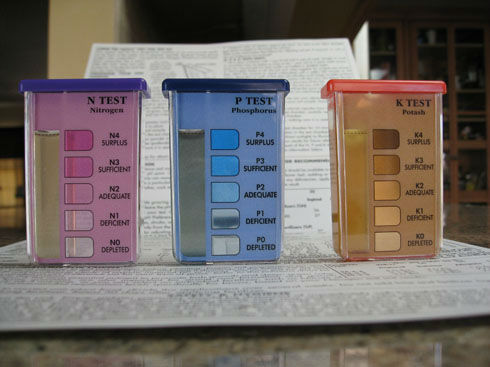
Most test kits available at hardware stores or via seed catalogs test for N, P, K, and pH. That’s nitrogen, phosphorus, potassium, and soil pH (which means potential Hydrogen, BTW). These test kits are best done with distilled water, lest the results reflect your water’s measurements rather than the soil’s.
To test for pH (alkalinity or acidity) you put a soil sample in the test chamber and add water, then add the capsule, which contains chemicals that reveal your pH levels. Leave it for 10 minutes then match the color to the chart. We find RapiTest is a good one.
RapiTest also can test for NPK, it’s easy to use but the process is a little more involved. You take a soil sample, add water, stir, and then wait between 2 to 24 hours for your soil to settle to the bottom. Then draw off the water on top with a pipette and add that to the chamber. Add the test capsule. Cover and shake. Then wait 10 minutes for the results.
The test kit also makes nutrient recommendations based on the results, but it’s important to note that their recommendations are based on using chemical fertilizers at higher levels than organic. So you may need to adjust your inputs for lower organic levels.
Lab Soil Tests
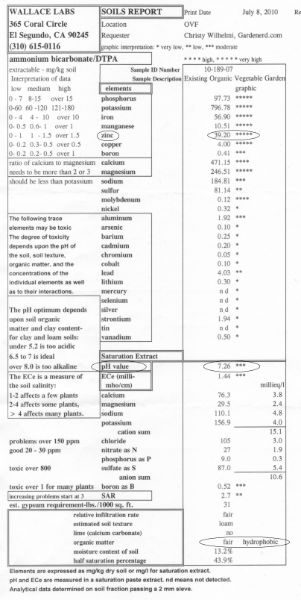
For more complete results, including heavy metals (which we highly recommend if you plan to grow edible crops directly in your existing soil), a chemical soil test is the next level of testing. Depending on where you live, your local university Agriculture department will offer low-cost soil testing, but heavy metals tests are often extra. It’s “easy to use” in that you simply take samples, put the soil in a bag, and send it away. The lab does all the rest.
Here in Los Angeles, we recommend Wallace Laboratories for a Standard Soil Suitability Analysis that includes heavy metals for a reasonable price ($85 at this writing). If your test shows moderate to high levels of any heavy metal, we recommend building raised beds or avoid growing certain crops that take up heavy metals (i.e. beets, chard and spinach take up lead).
Biological Soil Tests
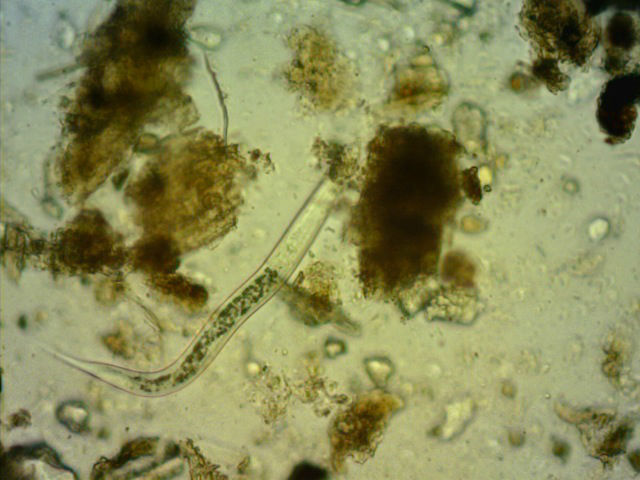
To really get a full picture of your soil, we highly recommend a biological soil test in addition to a chemical test. That is a screening of microbes living in your Soil Food Web (i.e. fungi, bacteria–good and bad, nematodes–good and bad, and other important nutrient cyclers in your system. You can have all the nutrients in the world in your soil, but if microbial life is lacking, plants can’t access some of those nutrients. We recommend EarthFort for biological soil testing.
If you suspect you have root feeding nematodes, go for the Advanced Biology Package (currently $144 as of Feb. 2020). From there you’ll be able to import the correct predator nematode or other microbial enhancement to help combat the issue. Again, it’s easy to take a sample and send it off to a lab. The results will make you a better gardener.
Long Answer, But There You Have it
So, Vincent, you have options for each type of soil test you want to take. Choose the options best for your situation and don’t be afraid to call the lab with your results for clarification. Most labs are happy to answer questions!
To see how we did a home soil test for our citrus read here.
Learn more about soil elements and microbes in the new Gardening For Geeks.
Thanks for writing in!