As a companion piece to the Thanksgiving Tip of the Week, it seems appropriate to dedicate a little bit of time to the subject of planting bulbs. When I first started gardening with flowers, I didn’t know anything about inedible plants. I loved color and fragrance, but was too intimidated to try roses or climbing vines. So I started with bulbs.
Growing bulbs really couldn’t be easier, or less of a commitment. Basically you dig a hole, you drop in a bulb and you bury it. Then you wait for spring. There are more subtleties to this task, but they aren’t tedious, in fact, the subtleties make for a nicer garden. Here are some tips for successful bulb gardening:
1) Start with Top Sized bulbs. They are the best you can get. Choose bulbs that aren’t cracked or moldy. Be sure to avoid bulbs that have started sprouting already as well. Good sources for top-sized bulbs are:
Also, I recently discovered a new site called Tulipworld.com which offers organic tulips. You have to order early though, because they run out of stock quickly for the year (bookmark this for next year). Each year, you can also find some of the least expensive bulbs that are still a good quality at Costco. Keep your eyes peeled though, because they come and go quickly.
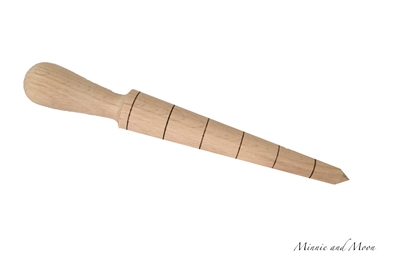
2) You can plant single bulbs or a cluster, and you can even plant for “naturalizing”, which means “to become established as if native.” To naturalize and give the appearance of bulbs having jumped up wherever their little hearts desire, simply broadcast (A.K.A. throw underhand in a sideways motion) a handful of bulbs across your lawn or gardening space and then plant them wherever they land. This creates a delightful surprise in spring. For planting single bulbs you can use a dibber for easy planting. We like this one from Minnie and Moon:
or if you have a bad back:
the Dutch Bulb Planter
For cluster planting, you can use a good old hand trowel to dig a circle as deep as your bulbs are required to be, place the bulbs in a circle, with one or two in the middle of the circle, cover and let be.
3) Mix in a handful of bulb fertilizer in the bottom of the hole. I have successfully used Garden’s Alive bulb fertilizer.
4) There is often discussion regarding whether you have to plant your bulbs with the pointy side up or not. The truth is that bulbs will right themselves without help from you, but if you want to give them a heads tart, plant with the small, pointy end up.
5) Layer! Because different bulbs have different planting depths, you can plant them in the same space at different levels. Gladioli, Daffodils and Dahlias can be planted 3-4 inches deep and above them (but not directly) you can plant Crocuses, Ranunculus, Anemones, and Lilies. Then you can plant Irises right on the surface and have a bonanza of bulbs all coming up at different times. Make sure to pair bulbs with different bloom times in order to extend the life of your garden.
What are your favorite bulbs to plant? Share them with us here.
Pingback: YouTube: December To-Do List - Gardenerd