In an effort to expand our garden ecosystem, we’ve gone the way of the farmer, adding backyard chickens to our list of on-site resources. This is the story of how we got started. We intend to share the process in hopes of making it easier for others who plan to do the same.
We spent two years researching and being skittish about getting them, while everyone with chickens kept saying, “Just get them!” 2012 rolled around, as did a New Year’s Resolution that this would be our Year of the Chicken, and everything fell into place.

We originally planned to build a coop, but after missing out on an opportunity to buy a used coop for dirt cheap, we bit the bullet and bought one on Ebay for close to dirt cheap.
The Foundation: Our coop assembled in an hour or so, but we had to build a foundation for it in order to level the area where we had chosen to place the coop. It’s also important to protect the chickens from predators, so we installed hardware cloth at the base of the foundation, extending out and down about 18″.

Not shown here, we also covered the exposed corners with hardware cloth. This material is more difficult than chicken wire for animals to dig through.
We attached the hardware cloth to the inside of the frame, leveled the frame and used surveyor stakes to secure it in place on the slope.

Then we back-filled to cover the wire.
We installed raccoon-proof latches to attach the coop to the frame, so that if needed, we could remove the coop entirely to clean out the run area. Husband’s genius idea #1.
Next: The Portable Run

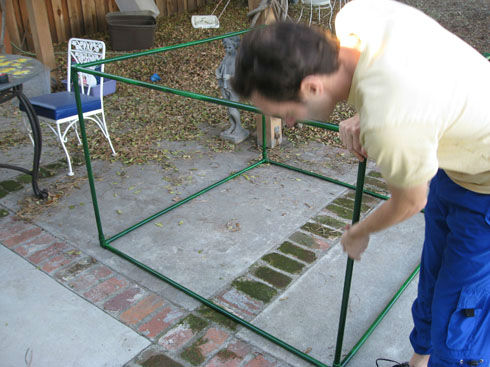
1/2″ pvc with corner connectors and clamps
We wanted to be able to move the chickens around the yard and allow them to till the soil for us in our raised beds (but only when we wanted them to), so we built a portable run that would extend their free-ranging space, and fit exactly over a 4×4 raised bed.
After sanding and spray painting the PVC (to camouflage it a bit) we assembled it easily with a mallet and elbow grease.

Next: Netting – To keep the birds contained, but also to keep the portable run light weight enough for one person to move it, we used bird netting for the sides and top. We used zip ties to anchor the bird netting in place, and left half of one side open to connect to the coop.

Lightweight materials make the portable run easy to move.
That’s It – We tested the run over a raised bed – perfect fit – then we pushed it up against the coop. We felt ready for chickens.

The portable run lines up to the coop door, allowing us to open and close the door and operate the pulley for the coop sliding door.
Food and Water – A quick trip to Malibu Feed Bin yielded a 50 pound bag of organic soy-free feed, some black oil sunflower seeds, some calcium (crushed oyster shell) and a bale of pine shavings for coop bedding. We were gifted with water and food dishes a year ago. Boy were we ready to use them!
Total start up costs: Including the 4 pullets on order and delivery, the coop, hardware, portable run materials, food and bedding came to $461. Considering that many coops alone cost that much, we felt pretty thrifty. Sure, at $5 per dozen, it will take 92 dozen eggs to recoup our start up costs, but we feel it’s worth it knowing that our hens will live happy lives and will be fed organically.
The nursery is painted, so to speak. We’re ready to receive our girls.
Stay tuned next week for the next chapter of Chicken Keeping.
UPDATE: Read on about the hens here.


wow, looks great! Now, let’s see those little chickens :o)