It happens every once in a while, probably every few months. Some people go on a bender. I go on a cooking jag.
The latest cooking jag involved making bread from a new book (more on this later), finding new ways to use a mountain of freshly harvested kale, and making the seemingly simple recipe for home made yogurt in a Thermos. It seems like every newsletter and magazine I opened in May featured home made yogurt, so the time had come to try it out.
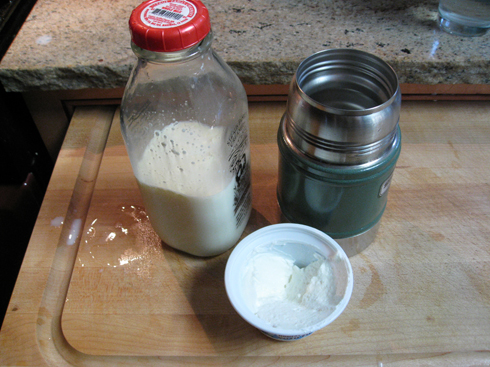
Other supplies needed are a saucepan and thermometer
Okay, so I combined these two recipes that I found online from Homegrown.org and About.com, to make what felt like a comprehensive recipe. Here’s how it went:
First – I heated the milk to 100º F
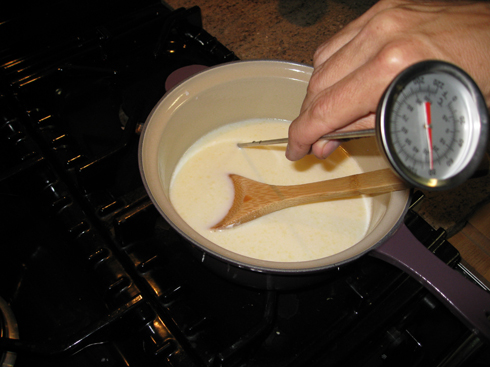
Next – I spooned out a little bit of the milk and mixed it into a couple tablespoons of yogurt. Then that mixture gets poured back into the heated milk once it’s off the stove.
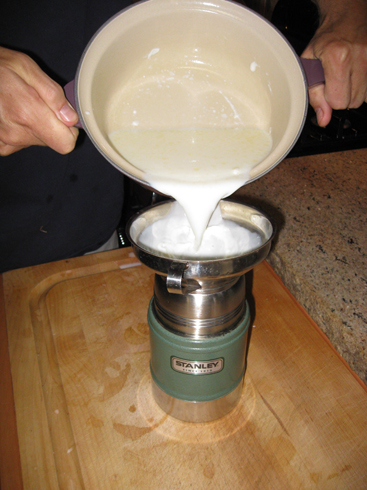
That’s about it – The next step is to pour the mixture into a wide-mouth thermos (definitely use a wide-mouth or else you’ll be cleaning out your Thermos with pipe cleaner forever.)
Waiting – the next step is to put the lid on the Thermos and warp it in a towel and let it sit on the counter for 10 hours, or overnight. In the morning, the yogurt fairies will have come and turned the hot inoculated milk into yogurt.
Guess what! – It worked! (Okay, it worked the second time I tried it. The first time I used, shall we say, less than fresh milk – won’t do that again.)
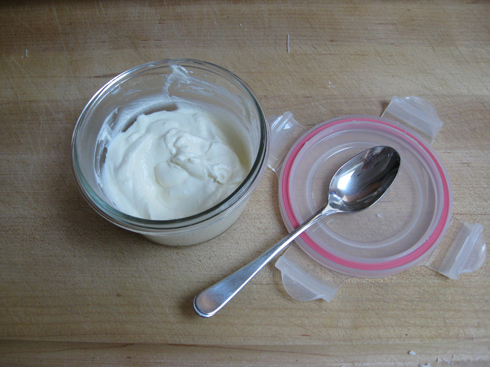
The next day – the instructions say to pour the yogurt into a strainer through some cheesecloth to drain it. This process, which takes a couple of hours, makes it thick like Greek-style yogurt and helps to remove some of the bitterness.

The results – actual yogurt, not very much of it, but actual edible yogurt made from fresh organic milk.
What have we learned?:
Get a bigger thermos – the 17 oz model holds 16 oz of milk, making about a single serving of yogurt. Cute.
Use new milk – perhaps the “expiration date be damned” approach works with some things, but not with cheese and yogurt making.
Keep the milk heated until ready to pour – in our first attempt we turned off the heat before mixing the starter and the temp dropped to 80 degrees in no time. Either have someone else mix the starter, or do it while stirring the milk on the stove at the same time.
Don’t help – squeezing out the whey isn’t necessary, nor is waiting until it’s all removed from the yogurt. It looks and tastes a lot more like ricotta cheese when you do that. Don’t do that.
I would like to try again using the oven (another option mentioned in the About.com article above) so that I can make a larger quantity. According to the recipe, you can make yogurt in a crockpot, on a heating pad (that’s all a yogurt maker is really), in the oven and yes, in the sun. If you think about it, yogurt is filled with active live cultures, so the idea of having it “go bad” doesn’t really apply here. You want the cultures to multiply.
If you’ve had experience making yogurt, feel free to weigh in here about how to make bigger batches with fewer mistakes. I’m all ears! For now, I’m going to mix a little yogurt with blueberries and cashews and just a touch of maple syrup for breakfast.


Pingback: Homesteading: Making Yogurt... Again.
I know there are different schools of thought around how high to heat the milk. The raw foods people don’t heat anything above 106º, but the cheese people heat it to 180º. I figured I’d try the lower heat level first to see how it worked. Thanks for sharing your insights and the ideas about extra powdered milk.
You are not heating your milk enough to kill competing bacteria so you may not get good youghurt. I heat to 180 then cool to 110-115, then innoculate and keep it warm. I use a lamp in my oven…like a lightbulb on a wire with a cover and I use the low wattage new bulbs. I always mix in extra powdered milk stirred in real well in the cold milk.